Because it is compatible with many sensors and with many home automation systems, I have decided to use ESP Easy firmware.
More info can be found at:
https://www.letscontrolit.com/wiki/index.php/ESPEasy
First, I will use a NodeMCU clone as a try, so we can test a sensor with it, and configure the ESP to send the sensor value to Domoticz. Then, later on, I will replace the NodeMCU by a raw ESP12E.
ESP Easy firmware can be downloaded at: https://sourceforge.net/projects/espeasy/
I will use the release R120.
Unzip the espeasy_r120 file. You will see the source folder, with the source code and library, and firmware already compiled in another folder, with its tool to flash it.
As we dont need to customize the code yet, I will use the flash tool to flash the NodeMCU.
First, locate your COM port number into the device manager.
Then, open the flash.cmd script:
- Type your port number
- Type the memory size of your module (mine is 1024)
- Type the release version: 120
Flashing the module should take about 1 minute.
Then, grab your mobile phone, and scan for wifi networks. If everything is OK, you should see a
ESP_0 wifi network in the list. Connect to it. The password is "
configesp".
Once connected, open your web browser and type:
http://192.168.4.1/setup
You should arrive on a page that asks you to select your wifi network, and to type the password. Then, hit
Connect.
Wait about 30 seconds to let the NodeMCU connect to your wifi network. The new IP address of the NodeMCU should be displayed on your web browser. If not, you can still use your router config page to find the NodeMCU IP address.
From a device on your network, open your web browser and type the NodeMCU IP.
The main ESP EASY config page should appear:
Then, click on the Config tab. From there, you will be able to change the name of the module and to put an admin password if needed.
As we want to use it with Domoticz, put your Raspberry Pi Domotivz server IP into Controller IP.
Port should be 8080 if you have not changed it.
By default, connection can be made anonymously to Domoticz. However, for security reason, it is possible to secure it with user and password.
For the beginning, we will use HTTP protocol. Later on, we will move to MQTT.
Dont forget to click on Submit at the bottom of the page.
Adding a sensor:
As a test, I am going to add a basic DHT11 temperature and humidity sensor. This sensor will be replaced by the BME280 once I will receive it.
To add a sensor, click on the
Devices tab. Click on device, and choose "
Temperature and Humidity DHT".
Provide a name to the sensor and choose the Pin that you want to use, GPIO-13 in my case.
You can also provide an IDX number. This one will have to match with the IDX number on Domoticz. We will cover that point later on.
Then, disconnect the NodeMCU to wire the DHT11 sensor.
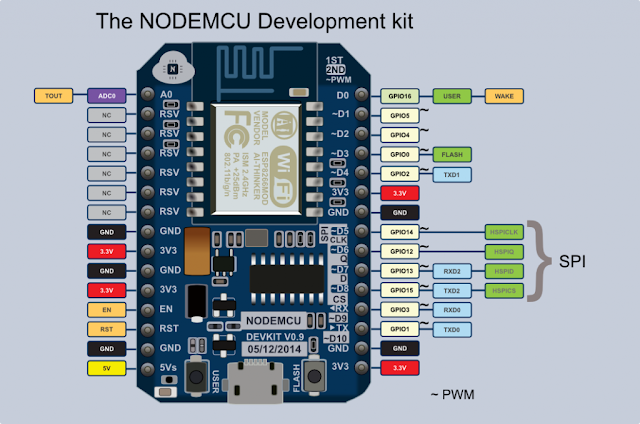
NodeMCU pinout:
So it should look like this (my DHT11 has only 3 Pins):
Now, power the NodeMCU, and browse to it, and click on
Devices:
After the 60 seconds default delay, you should see:
It works!!


